Vectorize
Summary
This document covers the information to gather from Cloudflare in order to configure a Qarbine data service. The data service will use the Qarbine Vectorize driver. You can define multiple data services that access the same Vectorize database though with varying credentials. Once a data service is defined, you can manage which Qarbine principals have access to it and its associated Cloudflare data. A Qarbine administrator has visibility to all data services.
Overview
Cloudflare Vectorize is a distributed vector database designed for fast, cost-effective storage and querying of vector embeddings to power AI search, Retrieval Augmented Generation (RAG), and other machine learning applications. It integrates with Cloudflare Workers AI, allowing developers to build full-stack AI-powered applications that can efficiently perform semantic search, recommendation, and classification. More information can be found at https://www.cloudflare.com/developer-platform/products/vectorize/
Vectorize Configuration
Determining Your Account ID
After signing on to https://www.cloudflare.com/, click the three highlighted dots and then the red highlighted option.

Paste the ID in a temporary location so that it can be used in the Qarbine configuration steps described below.
Authentication Options
Cloudflare Vectorize supports two main methods for authenticating requests.
| Header(s) Used | Authenticates With | Permission Scope | Security Risk | Modern Recommendation |
|---|---|---|---|---|
| X-Auth-Email and X-Auth-Key | Global API Key | Full account | Higher | Legacy, not preferred |
| Authorization: Bearer <token> | API Token | Scoped (limited) | Lower | Preferred |
X-Auth-Email and X-Auth-Key Headers
This method is still supported but is being phased out in favor of API tokens for better security and permission control. These headers are used together for authentication with your Cloudflare account's Global API Key.
- X-Auth-Email is your Cloudflare account email.
- X-Auth-Key is your Global API Key, which grants full access to your account.
This method is considered less secure because the Global API Key provides broad, account-wide permissions. If the key is exposed, it can be used to access or modify any resource your account has access to.
The API key is available by signing on to https://www.cloudflare.com/ and then navigating to

Next, click on the page highlighted below.

Interact with the Global Key in the area shown below.

Authorization: Bearer ... Header
This header is used with an API Token. API Tokens are preferred because they can be scoped-meaning you can limit their permissions to specific resources and actions, reducing security risk if a token is compromised. This method is recommended for new integrations and scripts, as it follows modern security best practices and is RFC compliant. API tokens can be created and managed in the Cloudflare dashboard, and you can specify exactly what each token can do.
- The token is passed as a Bearer token in the Authorization header as:
Authorization: Bearer <api_token>
Information on API tokens can be found at https://developers.cloudflare.com/fundamentals/api/get-started/create-token/
Token management is available by signing on to https://www.cloudflare.com/ and then in the upper right of the page navigating to the profile page via
Next, click the option highlighted below.
Interact as appropriate for your interface requirements. The following is one approach.
If you click “Create Token” then click the “Get Started” button.

Fill in the entry fields at the top of the page.
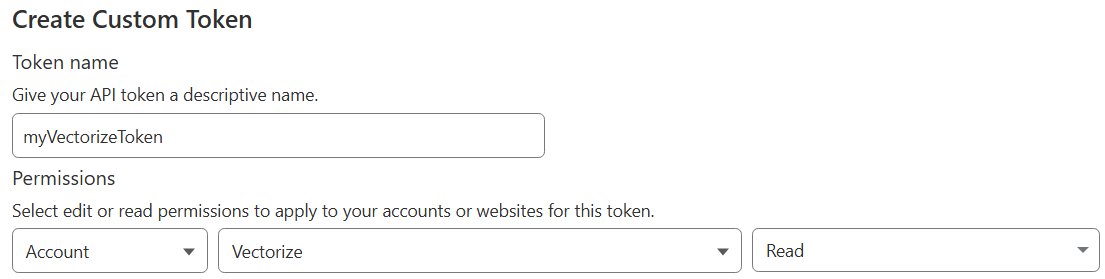
Adjust as desired

Adjust as desired

Adjust the TTL as desired. Upon expiration the Qarbine administrator will need to update the Data Service configuration described in more detail below.

Click

Review and then click

Click “Copy”

Paste the token in a temporary location so that it can be used in the steps described below.
Qarbine Configuration
Compute Node Preparation
Determine which compute node service endpoint you want to run this data access from. That URL will go into the Data Service’s Compute URL field. Its form is “https://domain:port/dispatch”. A sample is shown below.

The port number corresponds to a named service endpoint configured on the given target host. For example, the primary compute node usually is set to have a ‘main’ service. That service’s configuration is defined in the ˜./qarbine.service/config/service.main.json file. Inside that file the following driver entry is required
"drivers" :[
 . . .
"./driver/cloudflareVectorizeDriver.js"
]
The relevant configuration file name for non primary (main) Qarbine compute nodes is service.NAME.json. Remember to have well formed JSON syntax or a startup error is likely to occur. If you end up adding that entry then restart the service via the general command line syntax
pm2 restart <service>
For example,
pm2 restart main
or simply
pm2 restart all
Data Service Definition
Open the Administration Tool.
Navigate to the Data Services tab.

A data service defines on what compute node a query will run by default along with the means to reach to target data. The latter includes which native driver to use along with settings corresponding to that driver. Multiple Data Sources can reference a single Data Service. The details of any one Data Service are thus maintained in one spot and not spread out all over the place in each Data Source. The latter is a maintenance and support nightmare.
To begin adding a data service click
 .
.
On the right hand side enter a name and optionally a description.
Set the name and any description
Set the Compute URL field based on the identified compute node above. Its form is “https://domain:port/dispatch”. A sample is shown below.
Set the driver

By default retrieved model embeddings are cached on disk. To change this setting use

The cache subdirectory path is of the form “./cloudflare.cache/<model_name>”. An example is
“./cloudflare.cache/@cf/baai/bge-small-en-v1.5”.
Set the server template for the base URL to
For example,

Set your account, authentication and embedding parameters in the server options area. These values are double quoted and separated by a comma as shown in the sample below.

For direct Cloudflare text to embeddings use either
embeddingToken
or
These values are used for example when “nearText(someText, null, someModel)” is used. If dynamic embeddings are not to be used then specify an empty embeddingToken value.
Test your settings by clicking on the toolbar image highlighted below.

If the basic authentication with the API token is being used
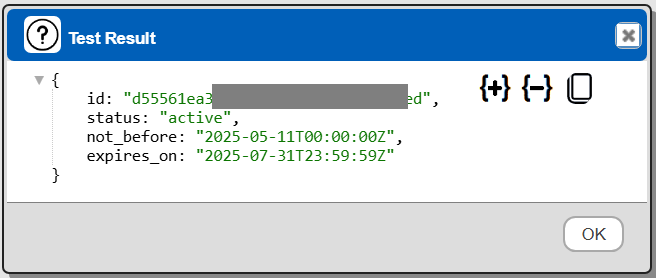
Otherwise the result should be
Save the Data Service by clicking on the image highlighted below.

The data service will be known at the next log on time. Next, see the Cloudflare Vectorize oriented query interaction and any tutorial for information on interacting with Vectorize from Qarbine.
References
More information can be found at https://www.cloudflare.com/developer-platform/products/vectorize/